6 An Emacs Starter Kit
A step-by-step guide to downloading and installing every piece of software I’ve mentioned so far is beyond the scope of this discussion. But let’s say you take the plunge and download Emacs, a TeX distribution, R, and maybe even Git. Now what? If you’re going to work in Emacs, there are a variety of tweaks and add-ons that are very helpful but not set by default. To make things a little easier, I maintain an Emacs Starter Kit for the Social Sciences. It’s designed to smooth out Emacs’ rough edges by giving you a drop-in collection of default settings, as well as automatically installing some important add-on packages. It will, I hope, help you skirt the abyss of Setting Things Up Forever.
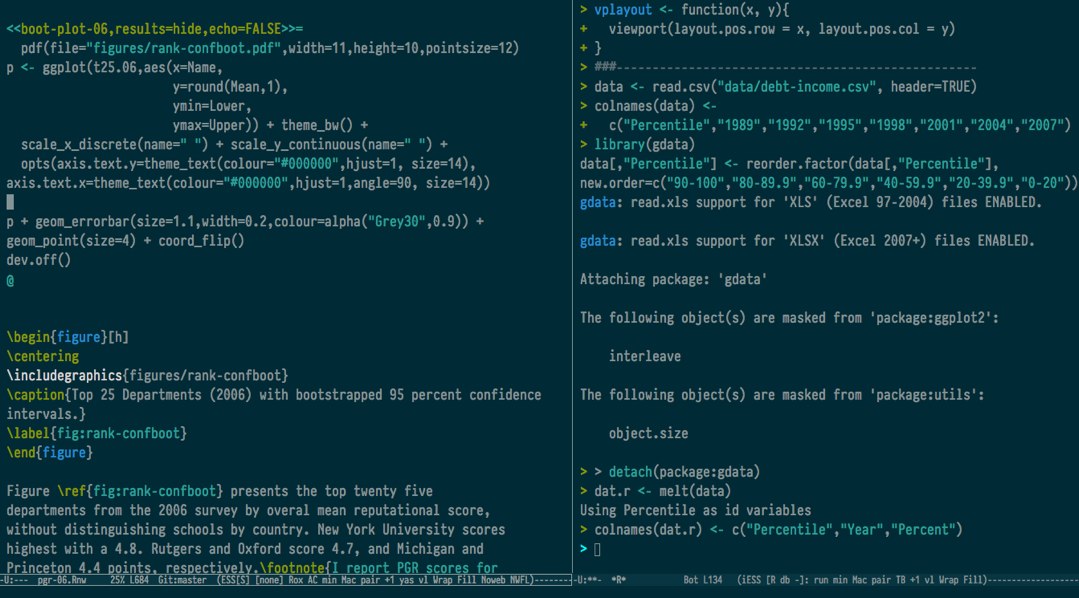
Figure 6.1: Emacs in Solarized colors.
What’s the motivation for the starter kit? Emacs is a very powerful
editor but it is less useful out-of-the-box than it might be, in part
because many convenient settings and modes are not activated by default.
The starter kit is a drop-in set of nice default settings. The idea is
for you to be able to download GNU Emacs, put the starter kit into
~/.emacs.d/, and get to work. If you already use Emacs and have a
.emacs file or ~/.emacs.d directory, the starter kit is designed to
replace them, while leaving a place for you to easily append your own
customizations.
The starter kit is designed to be used with GNU Emacs. Version 24.4
(released October 2014) or later is required. It will not work with
Aquamacs without
modification. More detailed commentary and documentation is provided
inside the kit’s .org files.
6.1 Installation Instructions (Mac OS X)
6.1.1 Before you Begin
If you want to use the tools that the starter-kit works with—LaTeX, R, Git, Pandoc, and all the rest—then you will need to install them on your Mac. The ground floor is Apple’s own suite of Developer Tools, which allow you to compile software yourself and include things like Git. The most straightforward way to get these tools is to install Xcode. Xcode is what software developers use to write Mac and iOS applications. As such it comes with a bunch of things we are not so interested in, but it makes it easy to install what we do need. It’s available for free via the Mac App Store. Once downloaded, launch Xcode, go to Xcode > Preferences > Downloads and install the Command Line Tools for Xcode. At that point you can quit Xcode and never use it again. Alternatively, go to Apple’s Developer Site, login with your Apple ID and download the Command Line Tools for Xcode package by itself, without the Xcode application.
If you have used Emacs before and already have a .emacs file or
.emacs.d directory, back them up and then delete them. See below for
details on how to add customizations to the kit.
6.1.2 Getting the Starter Kit
You have two choices. You can download a .zip file of the
kit.
This will give you a static snapshot of the most recent version. But if
you want to keep up with changes to the kit, you should clone the source
code using git rather than simply copying a static version of it. You
should be using version control on your plain-text documents anyway, so
I recommend this second option.
6.1.3 Prerequisites
- Get Emacs. The starter kit requires Emacs 24.4 (released October 2014). Download Emacs here. Alternatively, if you are comfortable with Homebrew, compile and install it.
- Install a Modern TeX Distribution and the Skim PDF reader. If
you are using OS X, download MacTeX
here and install
it. The kit is set up to use the Skim PDF
reader to display PDF files created
from .tex files. You can use other readers, but will need to modify
the setup in the starter-kit-latex.org file.
- Install R and Pandoc. These are not strictly required for the installation to work, and you can skip this step if you like. But you will probably be using them anyway, if you’re not already. If you’re doing statistical work you will probably want to use R or Stata.
- Note your user name or the name of your computer. If you don’t know either, open the Terminal application and do
$ whoamifor your user name and
$ hostnamefor the system name. You will need to know your login name to activate the final customization file properly. You can use the system name as well (or instead).
6.1.4 Setup
1. If you downloaded a .zip file of the kit, you must uncompress
it, move the resulting folder to the top level of your home director and
rename it .emacs.d. Assuming the downloaded zip file is in your
~/Downloads folder, open a Terminal window and do this:
$ cd ~/Downloads
$ unzip emacs-starter-kit-master.zip
$ mv emacs-starter-kit-master ~/.emacs.d
Alternatively, if you are using git (the preferred method), then clone the starter kit from github. Open a Terminal window and do this:
$ git clone git://github.com/kjhealy/emacs-starter-kit ~/.emacs.d2. Inside the file kjhealy.org, change the paths to any BibTeX
databases as described at the top of that file.
3. Rename the starter kit’s kjhealy.org file to that of
%your-username%.org or %your-systemname%.org, based on the
information you noted in 0.4 above. This is where you can add in any of
your own further customizations to Emacs.
4. Launch Emacs.
When you first start Emacs after installing the starter-kit, it will try
to contact several package repositories, so make sure you have an
internet connection. The kit will download packages mainly from the
official GNU ELPA repository and the MELPA
Repo. Each package will be fetched,
compiled by Emacs, and stored in the ~/.emacs.d directory. This
process is sometimes prone to hiccups as packages are fetched from the
servers, so please be patient with it. If it doesn’t get everything
first time around, quit and relaunch Emacs, and it will try again. If
the problem persists—especially if you get a message saying “The package
‘auctex’ is not available for installation”—you can manually install
packages as follows. Open Emacs, do M-x list-packages and in the
resulting buffer search or scroll down the list to, e.g. Auctex, mark it
for installation by pressing i and then install it (or them) by
hitting x. With the packages in place, restart Emacs and the starter
kit will finish setting itself up. Unfortunately, I can’t control these
intermittent installation errors. They seem to have something to do with
the way Emacs talks to the GNU ELPA package server.
5. (Optional.) Once Emacs is up and running, do
M-x starter-kit-compile to byte-compile the starter-kit’s files, for
slightly faster loading.
6.2 Using Marked
In everyday use, I find Brett Terpstra’s application Marked to be a very useful way of previewing text while writing. Marked shows you your Markdown files as HTML, updating the preview on the fly whenever changes are saved in the Markdown file. It can render ordinary Markdown by default, and will work that way immediately for you. But it also supports pandoc as a custom processor. This means it can manage the various extra bells and whistles of scholarly formatting discussed so far. Essentially, you tell Marked run a pandoc command similar or identical the one shown above to generate its HTML previews. You do this in the “Advanced” tab of Marked’s preferences. The “Path” field in the preferences dialog contains the full path to pandoc, and the “Args” field contains all the relevant command switches—in my case, the same as in the Makefile above.
When editing your markdown file in your favorite text editor, you point Marked at the file and get a live preview. You can add the CSS files in the pandoc-templates repository to the list of Custom CSS files Marked knows about, via the “Style” tab in the Preferences window. That way, Marked’s preview will look the same as the HTML file that’s produced. Figure 6.2 shows what this looks like in practice.
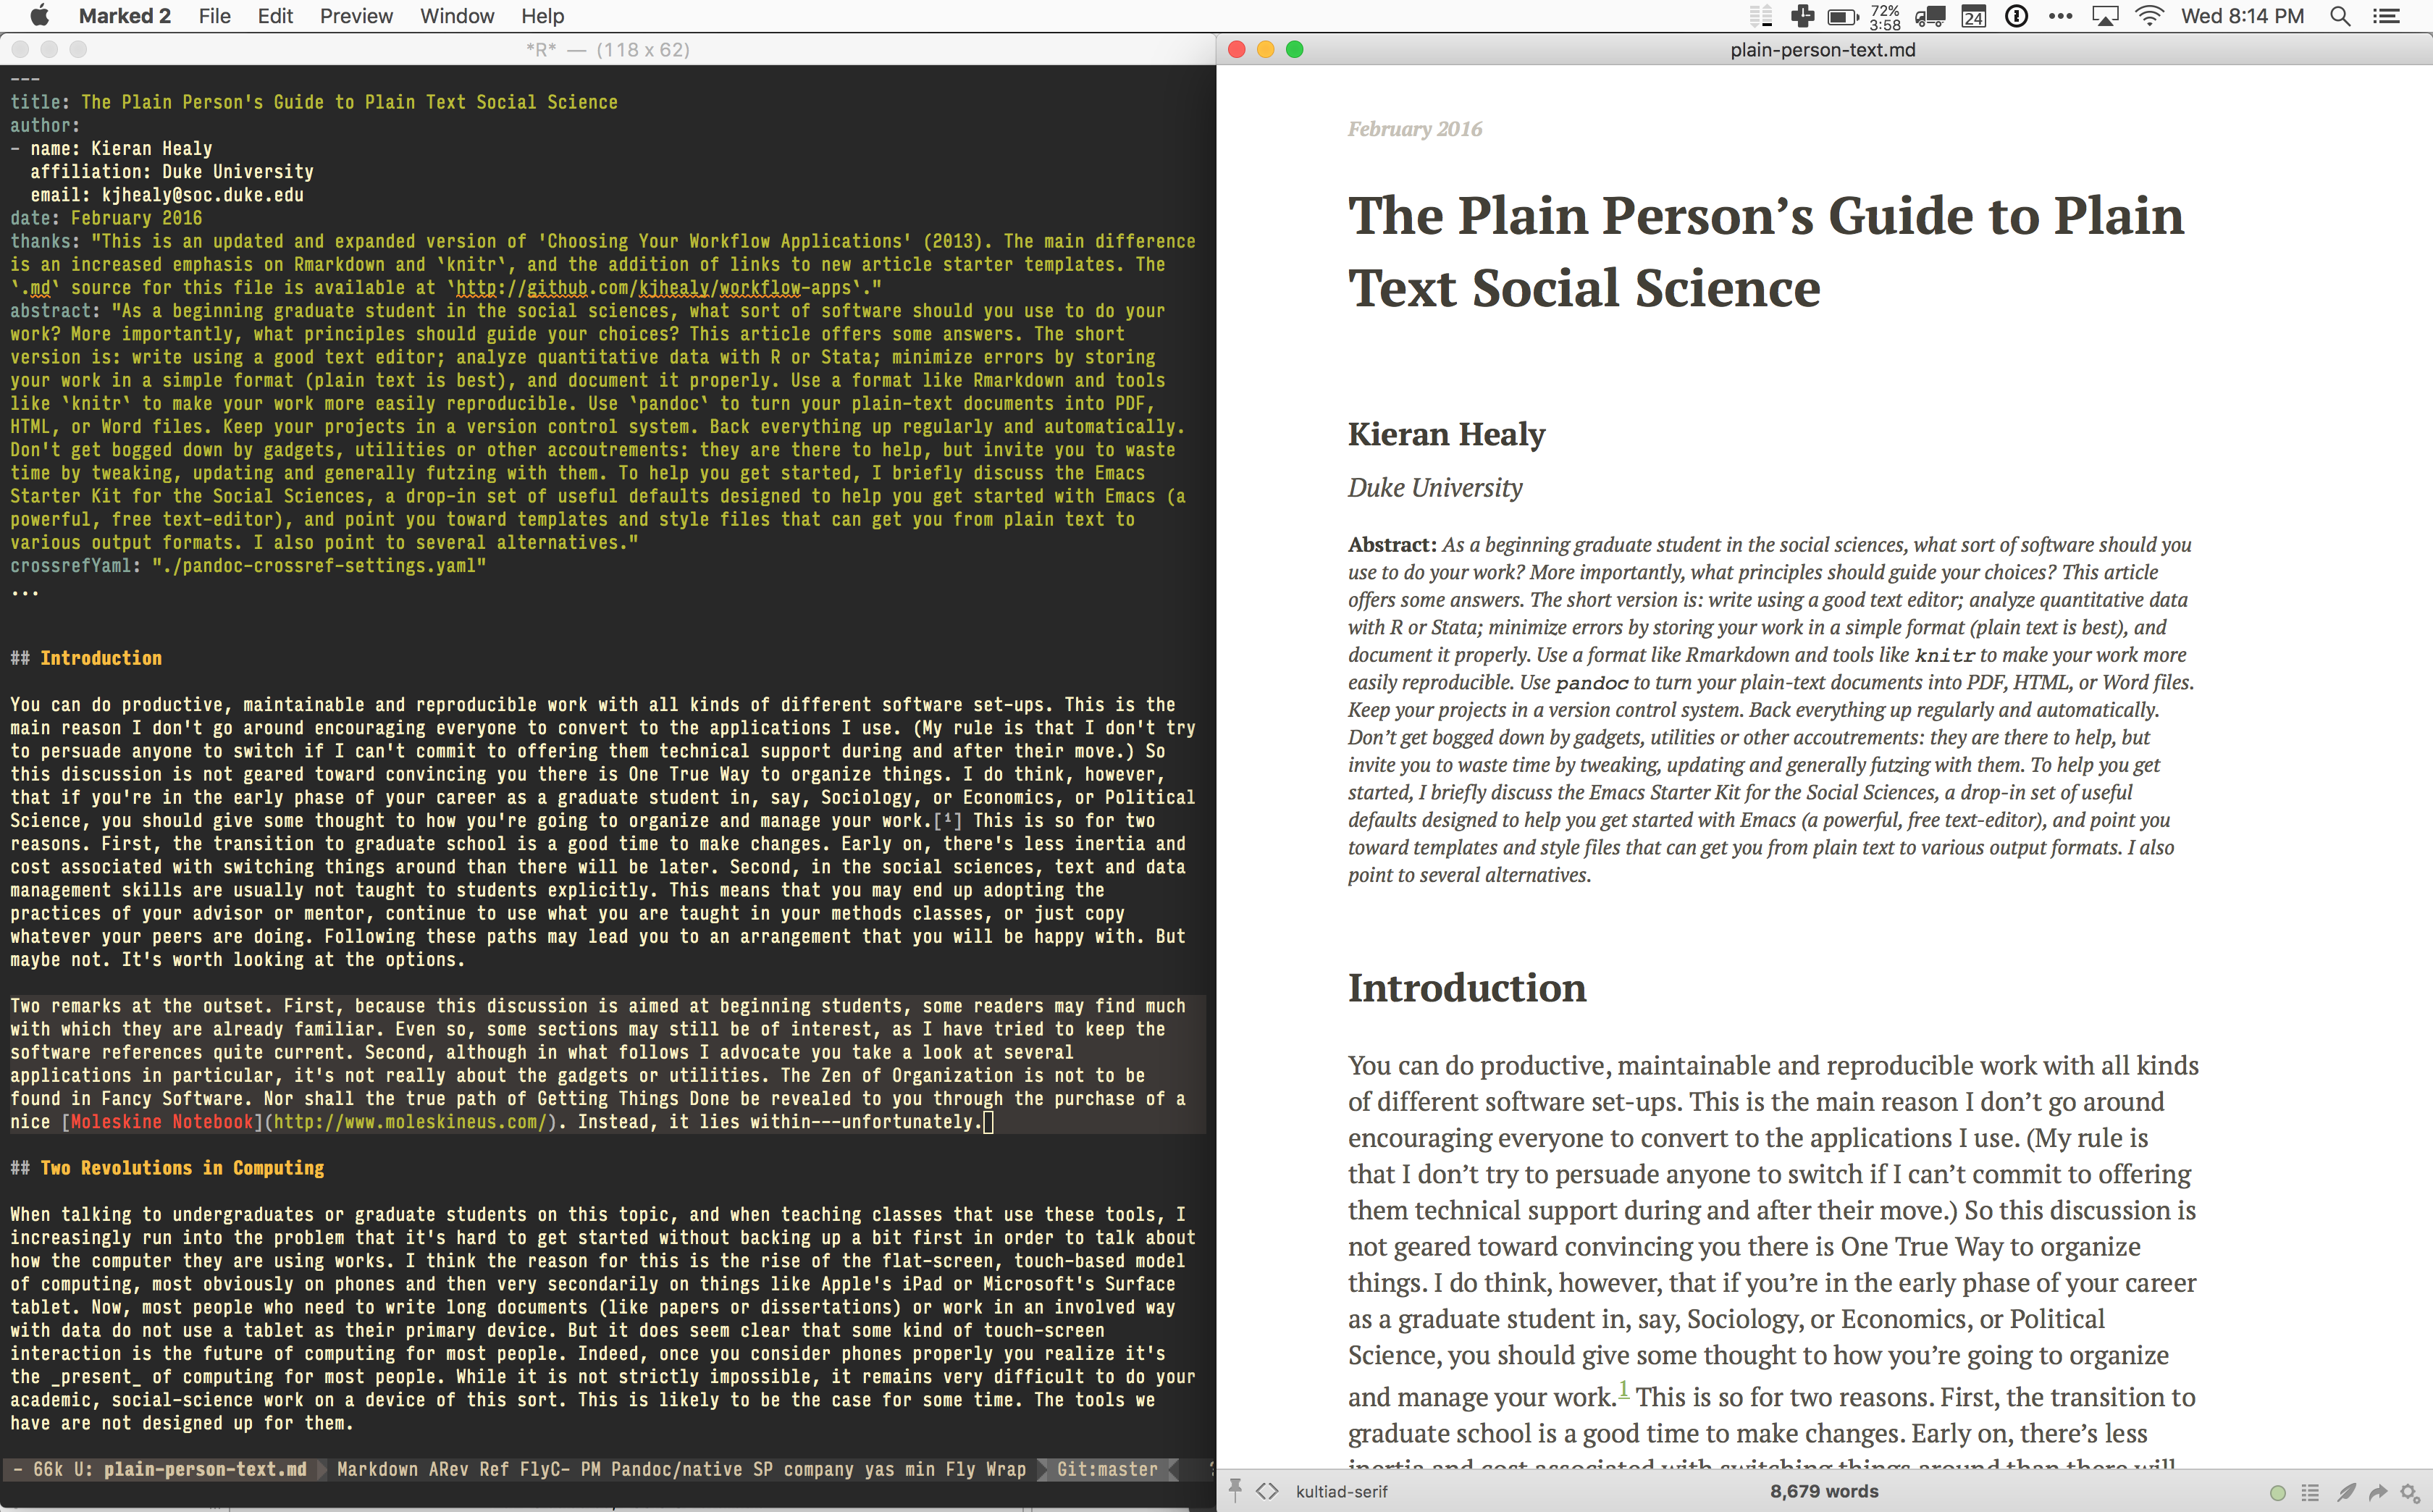
Figure 6.2: Working on this document in Emacs (left), with a live HTML version displayed in Marked (right).
The upshot of all of this is powerful editing using Emacs, ESS, R, and other tools; flexible conversion using pandoc; quick and easy previewing via HTML and Marked; and high-quality PDF typesetting at the same time (or whenever needed). All of it can be generated directly from plain text, and will include almost all of the machinery most scholarly papers need, most notably properly labeled Tables and Figures that can be cross-referenced in the text. While it all may seem quite complex when laid out in this way, in use it is quite straightforward, and doesn’t require any thought when in use. I just live in my text editor. The various scripts and settings do their work quietly, and I get the formatted output I want.